Building
To get from source code to a playable ROM (.vb) file, you’ll need to build your code.
VUEngine Studio’s build chain allows you to build your project and queue running it in an emulator, flash to your flash cart(s) or export the ROM, all in a unified workflow and in fully embedded tools.
# Build Panel
The central spot for building is the Build Panel.
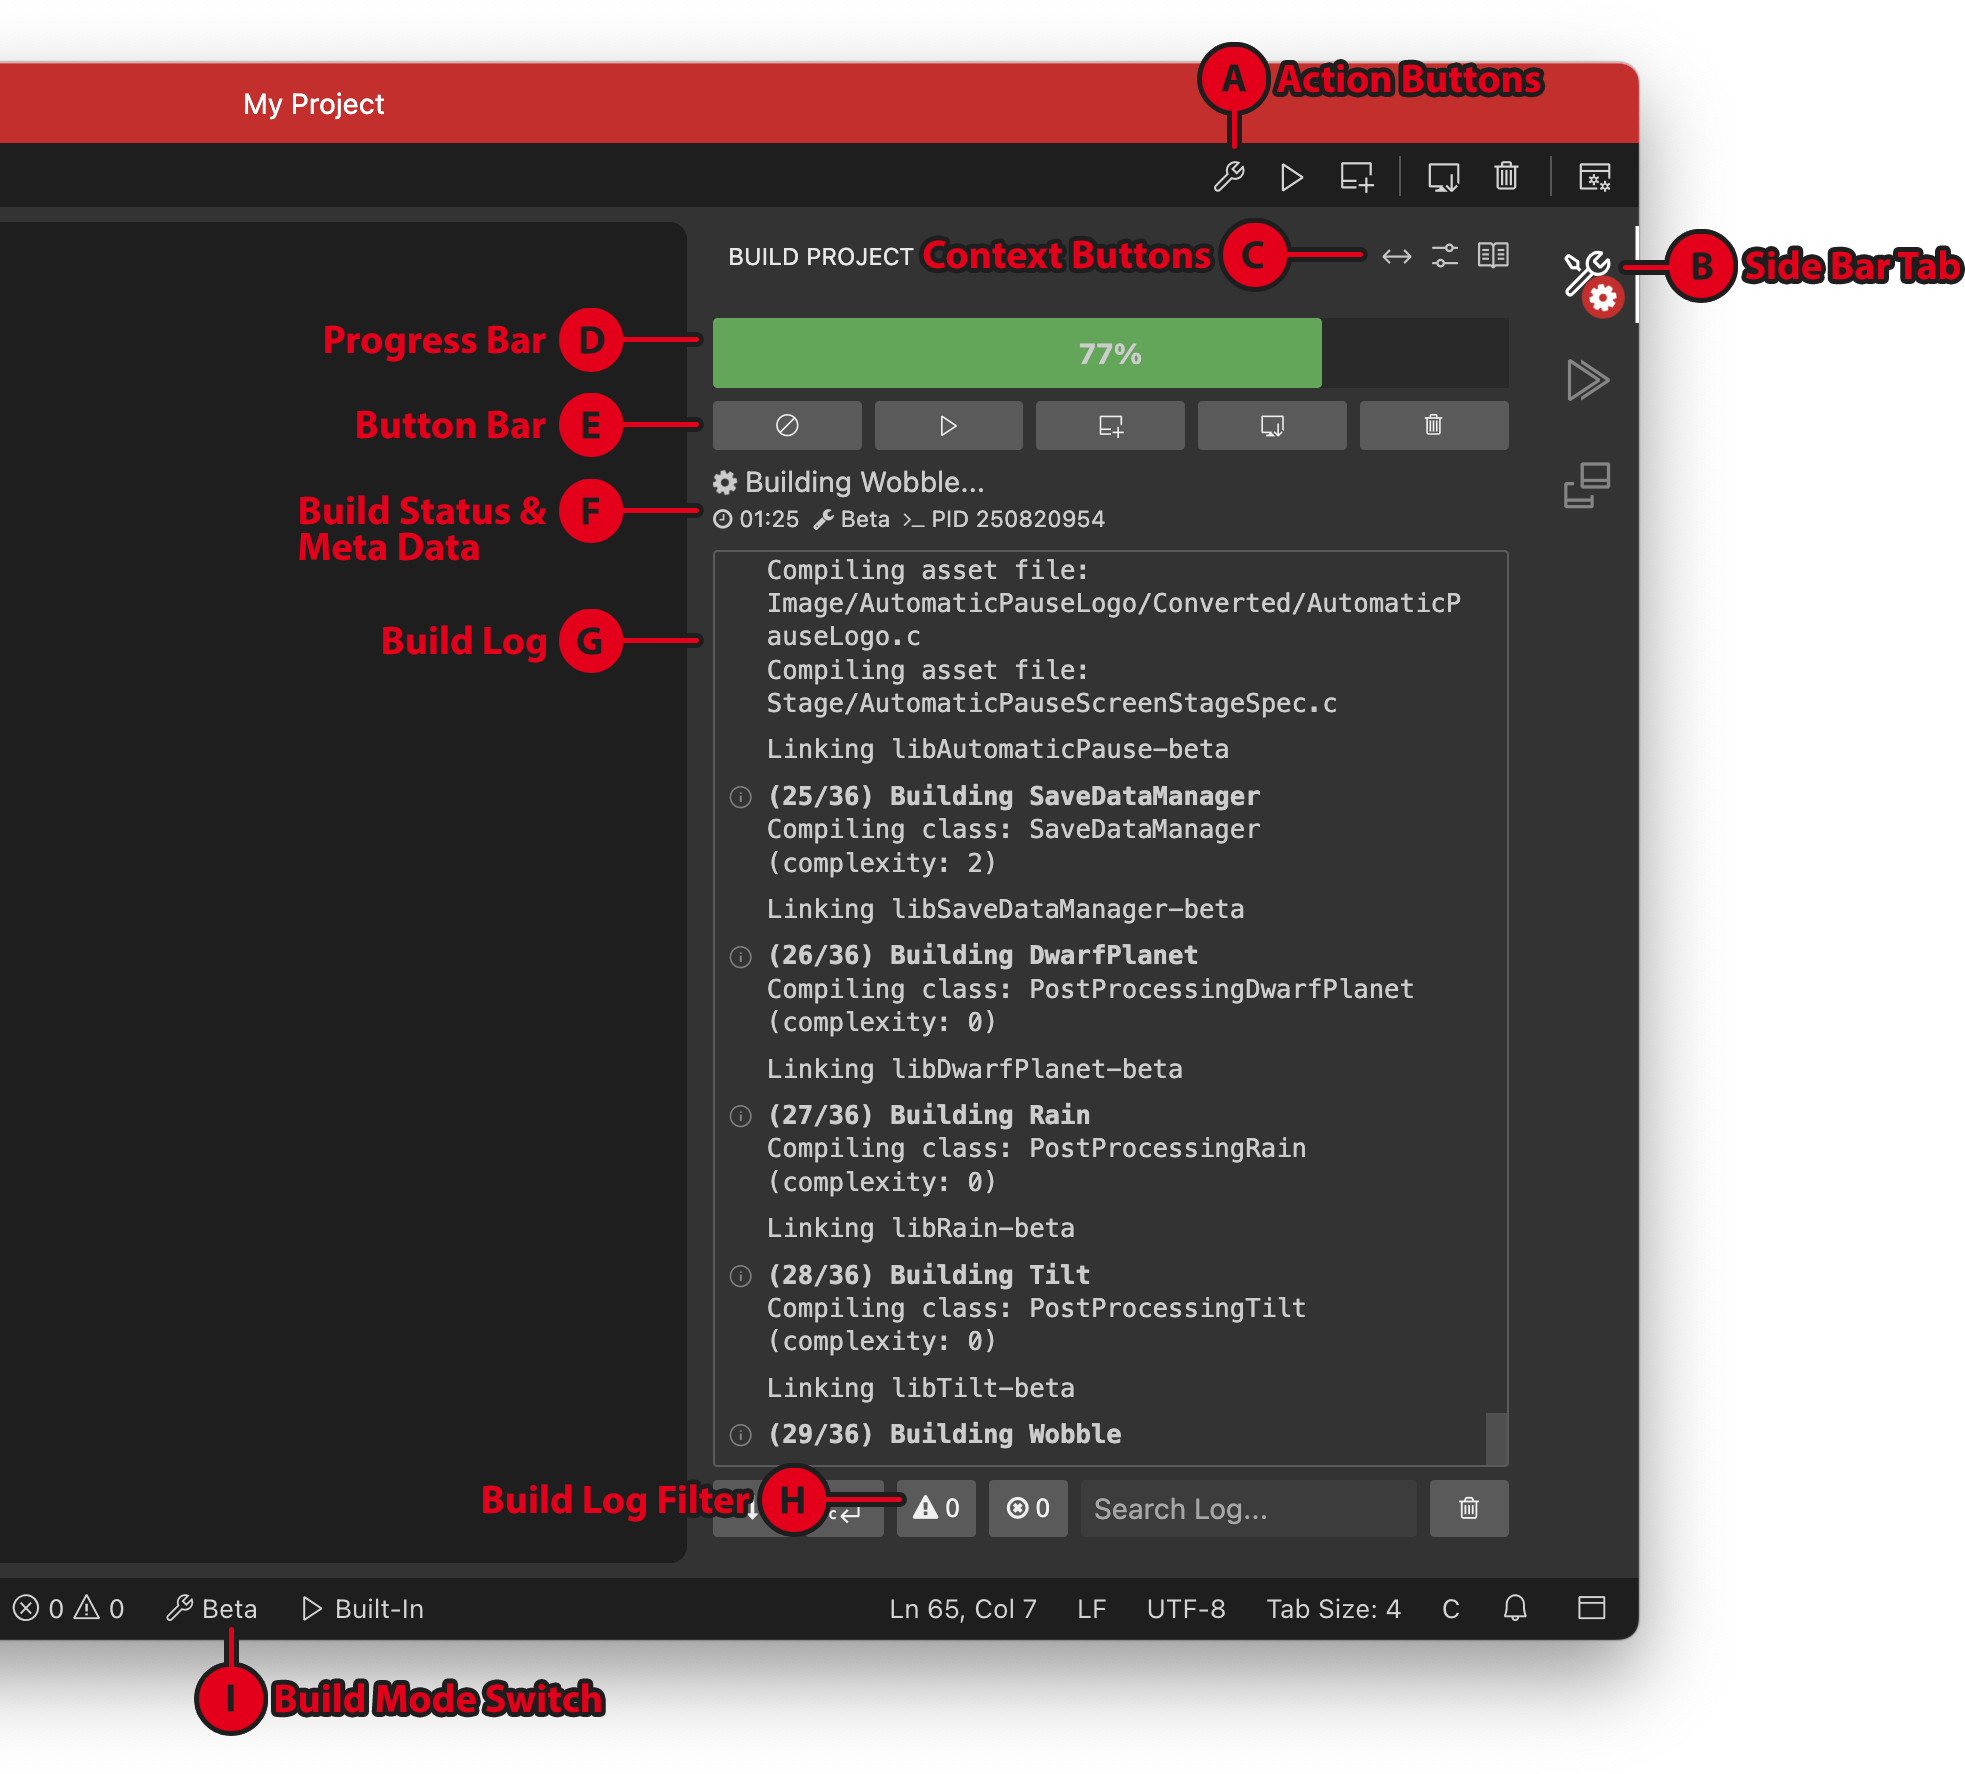
# Action Buttons
The toolbar Action Buttons (A) in the top right of the application allow you to quickly start a build, run or flash a game, clean the build cache and more.
If you click on Run or Flash without a ROM being built yet, a build will start and the respective action will be queued and executed once the build is completed. Click the button again to unqueue. Click the other button, respectively, to queue/unqueue that action as well. Clicking the Build button while a build is running toggles the Build Panel.
Click the Clean button to delete the build cache for the current mode.
The progress bar on the Build button will turn yellow once a warning occured. It will be colored red if a build failed.
Keyboard shortcuts:
- Build: Shift+Alt+B
- Run: Shift+Alt+R
- Flash: Shift+Alt+F
- Clean: Shift+Alt+C
# Side Bar Tab
The Build Side Bar Tab (B) allows you to toggle the visibility of the Build Panel by clicking on it. It can also shows the current build status and progress:
- Cog for running build
- Checkmark for a successful build
- Cross for a failed build
# Context Buttons
The Context Buttons (C) in the Build Panel’s header allow you to (in this order):
- Maximize the panel’s size. When maximized, use the far-right icon appearing in the Action Button Bar (A) to bring the panel back to its regular size.
- Open the settings dialog with build-related options.
- Open this documentation page.
# Progress Bar
The Build Progress Bar (D) Shows you the progress of the current build. It will turn yellow once any warnings occur.
# Button Bar
The Button Bar (E) below the progress bar allows you to (in this order):
- Cancel the currently running build
- Start the resulting ROM in the emulator
- Flash the resulting ROM to your flash cart(s)
- Export the resulting ROM
- Clean the build folder
# Build Status & Meta Data
Below the build button bar, you’ll find the current build’s status. This includes the current activity, running time, Build Mode and ID of the build process. On Windows machines, if you are building through WSL, you’ll also find an indicator for that here.
# Build Log
The large area in the center of the build panel is holding the Build Log (G). In shows the output of the build process running through make. Errors are highlighted in red, warnings in yellow.
# Build Log Filter
The Build Log Filter buttons (H) below the Build Log allow you to filter the Build Log to show only warnings (center button) or errors (right button). By default, the Build Log automatically scrolls to the very bottom when it gets updated. Use the left button to toggle that behaviour.
# Build Mode Switch
A Build Mode Switch (I), which shows the current build mode, can be found in the Status Bar. Click to change the build mode. See the chapter below for more into about Build Modes.
# Build Modes
VUEngine can be built in different modes, for different purposes. You can change modes in various ways:
- Via the respective status bar entry (see screenshot above)
- Via the
Build: Set Build Modecommand - Via the menu: Build > Set Build Mode
- Via the Touch Bar (MacBook Pro only)
- By changing the respective setting:
"build.mode": "Beta"
The following modes are available:
- Release: Includes no asserts or debug flags, for shipping only.
- Beta (Default): Includes selected asserts, for testing on emulators.
- Tools: Includes selected asserts, includes debugging tools.
- Debug: Includes all runtime assertions, includes debugging tools.
Normally, you’ll work in Beta mode, which includes a selected set of debug asserts. When debugging, you’ll want to switch to Tools mode, to include the engine’s various debugging tools, or to Debug mode for the full set of runtime assertions and debug output. Be warned that Debug mode is heavy on resources and has the potential to slow down your program considerably. Finally, to build a releasable ROM, you’ll want to build in Release mode to get rid of any asserts or debug flags.
# Debug
In this mode, the produced ROM will contain all the safety checks that the engine implements with the aim to prevent undefined behavior caused by passing around invalid pointers.
The calls to SomeClass::safeCast will be internally converted into a call to Object::getCast, which will perform a RTTI check on the provided pointer to ensure that it is an instance of the intended class.
The same check will be performed at the start of each class method on the this pointer.
There is a heavy performance hit in this mode and the amount of calls to Object::getCast can easily overflow the stack if not careful. Because of this, the engine halves the configured target frame rate to mitigate that scenario from happening.
Debug mode enables the Developer Tools.
# Tools
This mode removes some of the checks that debug mode enables, letting the games to run at the intended frame rate target, but still enables access to the Developer Tools.
# Beta
This is the default building mode in VUEngine Studio and is the recommended one for development. It disables the Developer Tools and removes the injected of the safety checks added by the transpiler in debug and tools modes, but leaves in the checks performend through the explicit usage of the NM_ASSERT macro.
Although it still entails a significative performance hit that makes ROMs compiled in this mode generally too slow to represent the final game as it should be playable on hardware.
# Release
This is the mode intended to produce ROMs that should perform well on the Virtual Boy. To acomplish that, it removes almost all but the most critical safety checks that the engine implements, which are only removed by defining the __SHIPPING macro through the EngineConfig editor.
It is strongly adviced to not use this mode through development, but only for testing on hardware.
# Build Options
Additional build options are available through the settings dialog. These will prove helpful when having to debug harder problems.
Build: Dump Elf: Dump assembly code and memory sections.- Pedantic Warnings: Enable pedantic compiler warnings.
"build.dumpElf": false
"build.pedanticWarnings": false
# Cleaning Build Cache
Sometimes you may want to, or have to, clean up the build folder before starting a build to start with a clean plate.
Hit the Clean Action Button, use the keyboard shortcut Shift+Alt+C or use the command palette to execute the Build: Clean Build Folder command.
This will delete the respective subfolder in the build folder for the currently selected Build Mode (build/{mode}).
# Pre and Post Build Tasks
If, for some reason, you need to run certain Tasks or Commands before or after each build, you can set up pre and post build tasks according to your needs. There’s two preferences for that take any number of Tasks or Commands and work through them sequentially.
"build.tasks.pre": []
"build.tasks.post": [{
    "name": "Patch ROM", // Depending on the type, either a task label or command ID.
    "type": "Task" // Can be either "Task" or "Command".
}]
In the above example, the output ROM would be patched through the “Patch ROM” Task after the build completed.
See the Tasks page to learn how to set up a Task.
Tip: The JSON preferences editor will assist you with auto completion of option names and, if applicable, values.
# The ROM file
A successful build will result in the creation of a Virtual Boy ROM, a binary V810 machine code file that can be run on a Virtual Boy using a flash cart or on a Virtual Boy emulator. It will be written to build/{mode}/output-{mode}.vb and copied to build/output.vb.
# Troubleshooting
# I am getting the following error after compiling, what does it mean?
/opt/gccvb/lib/gcc/v810/4.4.2/../../../../v810/bin/ld: main.elf section '.bss' will not fit in region 'ram'
/opt/gccvb/lib/gcc/v810/4.4.2/../../../../v810/bin/ld: region 'ram' overflowed by xx bytes
In the context of the engine, it means that the memory pool is too big. You’re trying to reserve more RAM than physically exists.