Title Screen
We should start off with something simple, instead of getting into the more complicated actual game state just yet. Hey, the game we are developing should at least have a minimal title screen, right? So let’s go ahead and transform MyGameState into TitleScreenState.
# State
First, rename the files source/States/MyGameState/MyGameState.c and source/States/MyGameState/MyGameState.h, as well as the folder, to source/States/TitleScreenState/TitleScreenState.c and source/States/TitleScreenState/TitleScreenState.h respectively.
Then, in the aforementioned files, all occurences of MyGameState must be replaced by TitleScreenState.
singleton class TitleScreenState : GameState
{
    [...]

    /// Method to GameSaveDataManager the singleton instance
    /// @return AnimationSchemesState singleton
    static TitleScreenState getInstance();

    [...]
}
#include <TitleScreenState.h>

[...]

void TitleScreenState::enter(void* owner __attribute__((unused)))
{
    Base::enter(this, owner);

    [...]
}

[...]
Also change the references to MyGameState in source/Game.c.
[...]
#include <TitleScreenState.h>

GameState game(void)
{
    [...]

    // Return the first GameState
    return GameState::safeCast(TitleScreenState::getInstance());
}
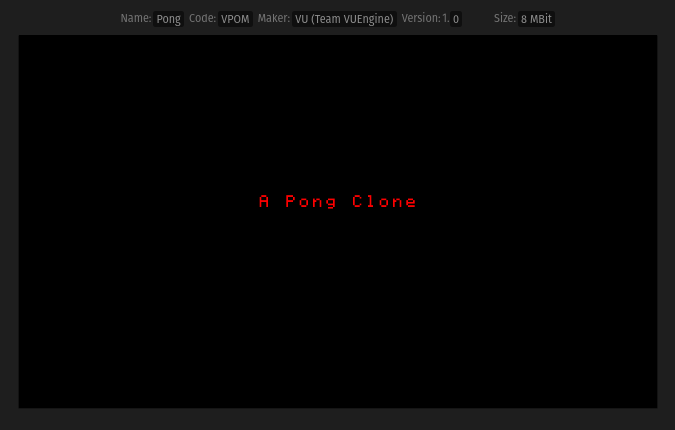
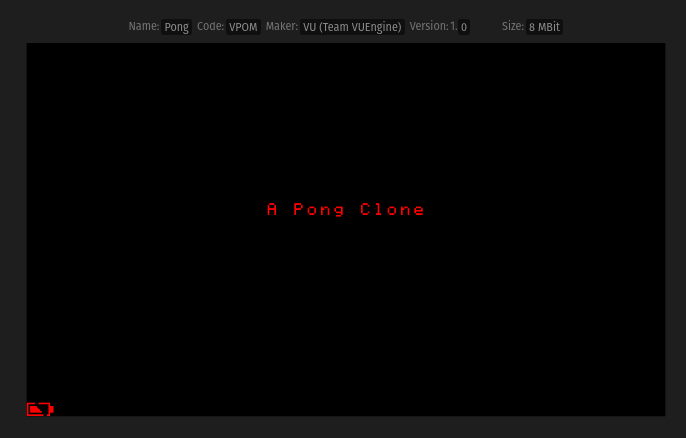
Finally, we will change the message printed to the screen by modifying the method TitleScreenState::print to look as follows:
void TitleScreenState::print()
{
    Printer::text("A Pong Clone", (__SCREEN_WIDTH_IN_CHARS >> 1) - 6, 12, NULL);
}
If a font name is not provided to the Printer::text function by passig it NULL as the last argument, a configurable default one will be used by the engine.
The output when the game is rebuilt will be:
But we can do better and replace that simple text with a nice image. To do that, we need to create an Actor, attach a Sprite component to it and finally add the Actor to the title screen’s Stage.
# Actor
We want to replace the text with the following image, pong-logo.png. Click it to download.
![]()
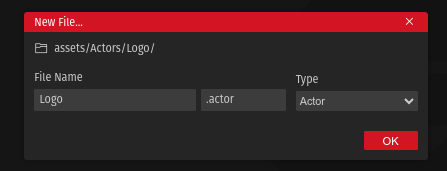
First of all, create the folder assets/Actor/Logo and add an .actor file in it by right clicking the Logo folder and selecting “New File”. Enter “Logo” as the file name and select the Type “Actor” in the dropdown on the right hand side.
Our newly created file, Logo.actor will automatically be opened and you will see an empty editor with a single button that reads “Add Component”. Click it and select “Sprite” from the drop down menu. The newly added Sprite component will automatically be selected and an editor panel for that component will be shown on the right hand side.
![]()
In that panel, an image can be added by clicking the “Source Image” box at the top. Once a file has been selected, a preview of the Sprite will be visible in the editor.
![]()
Behind the scenes, VUEngine Studio will generate the file Converted/LogoActorSpec.c next to our Logo.actor file, it will contain the necessary Spec(s) to add our logo Actor to the Stage.
![]()
Attention: The current version of the actor editor has a bug that prevents it from detecting any changes when adding a sprite component, or after adding an image source to it. As a workaround for the time being, you will have to do another change, e.g. setting the palette to 1 and back to 0, before the sprite component gets detected and can be saved.
# Stage
Internally, Stages are created by the engine by passing a StageSpec pointer to GameState::configureStage. A StageSpec holds all the configuration details to instantiate a Stage and populate it with game Actors.
At this moment, TitleScreenState initializes its Stage with the MyGameStageSpec, which is defined in the file assets/Stage/MyGameStageSpec.c. Rename the file to assets/Stage/TitleScreenStageSpec.c and, in it, change all occurences of “MyGameStage” to “TitleScreenStage”.
At the beginning of the file, you will find two arrays - TitleScreenStageUiActors and TitleScreenStageActors. These have entries that reference the ActorSpecs to use to instantiate and initialize the Actors that will populate the Stage.
The arrays are very simple right now, containing only LowPowerIndicatorActorSpec, which is provided by the “Low Power Actor” plugin:
PositionedActorROMSpec TitleScreenStageActors[] =
{
    {&LowPowerIndicatorActorSpec, {__PLUGIN_LOW_POWER_ACTOR_X_POSITION, __PLUGIN_LOW_POWER_ACTOR_Y_POSITION, __PLUGIN_LOW_POWER_ACTOR_Z_POSITION}, {0, 0, 0}, {1, 1, 1}, 0, NULL, NULL, NULL, false},

    {NULL, {0, 0, 0}, {0, 0, 0}, {1, 1, 1}, 0, NULL, NULL, NULL, false},
};

PositionedActorROMSpec TitleScreenStageUiActors[] =
{
    {NULL, {0, 0, 0}, {0, 0, 0}, {1, 1, 1}, 0, NULL, NULL, NULL, false},
};
When TitleScreenStageSpec is passed to TitleScreenState::configureStage from the TitleScreenState::enter function, as shown below, an Actor will be created according to the LowPowerIndicatorActorSpec:
void TitleScreenState::enter(void* owner __attribute__((unused)))
{
    [...]

    // Load stage
    TitleScreenState::configureStage(this, (StageSpec*)&TitleScreenStageSpec, NULL);

    [...]
}
The entry for the low power indicator in the TitleScreenStageActors array not only references the LowPowerIndicatorActorSpec, but also specifies a transformation: position, rotation and scale. We can neglect the latter two, but should have a look at the position.
The coordinate system used by the engine has the X axis going from left to right and the Y axis top to bottom. The center of the screen is at the coordinates {0, 0, 0}. So, since the Virtual Boy’s screen is 384 pixels wide and 224 pixels tall, to get the indicator to show at the left-bottom corner, we can modify the coordinates to {-192, 112, 0}:
{&LowPowerIndicatorActorSpec, {-192, 112, 0}, {0, 0, 0}, {1, 1, 1}, 0, NULL, NULL, NULL, false},
But, as seen in the screenshot below, this doesn’t look quite right. Since the indicator’s center will be at the given point, it is not fully visible.
Note: The Low Power Actor will only show when the Virtual Boy’s battery power is low, but this can be simulated in the built-in emulator by pressing W.
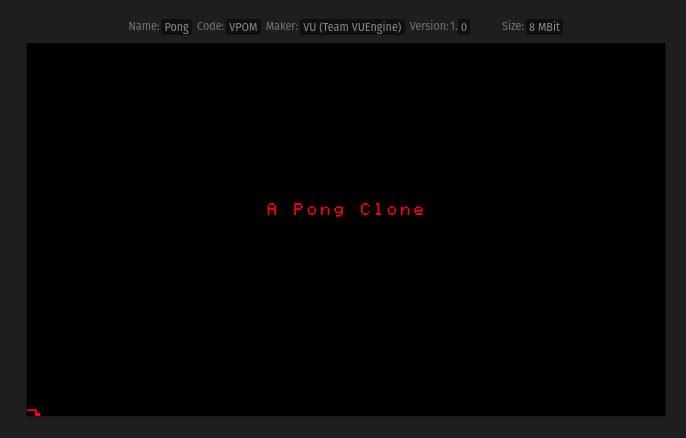
We have to account for the indicator’s image size and subtract half of its width and height from the X and Y coordinates, respectively.
{&LowPowerIndicatorActorSpec, {-192 + 8, 112 - 4, 0}, {0, 0, 0}, {1, 1, 1}, 0, NULL, NULL, NULL, false},
Now, the indicator will be properly shown:
With this new knowledge, we can now follow the example of the low power indicator to add our previously created Logo Actor to replace the simple text title. We want the logo to display in the center of the screen, so {0, 0, 0} are the coordinates to use. Don’t for get to also declare LogoActorSpec above with the line “extern ActorSpec LogoActorSpec;”.
[...]

extern ActorSpec LogoActorSpec;

PositionedActorROMSpec TitleScreenStageActors[] =
{
    {&LogoActorSpec,                {0, 0, 0}, {0, 0, 0}, {1, 1, 1}, 0, NULL, NULL, NULL, false},
    {&LowPowerIndicatorActorSpec,   {-192 + 8, 112 - 4, 0}, {0, 0, 0}, {1, 1, 1}, 0, NULL, NULL, NULL, false},

    {NULL, {0, 0, 0}, {0, 0, 0}, {1, 1, 1}, 0, NULL, NULL, NULL, false},
};

[...]
Note: Never remove the final entry,
{NULL, {0, 0, 0}, [...], or bad things will happen. This is a delimiter, used by the engine to know when it is done reading ActorSpecs.
Finally, to get rid of the text title, remove all calls to TitleScreenState::print from the TitleScreenState::enter and TitleScreenState::resume methods, as well as the method itself. After another round of build and run, the image will show up in the emulator.
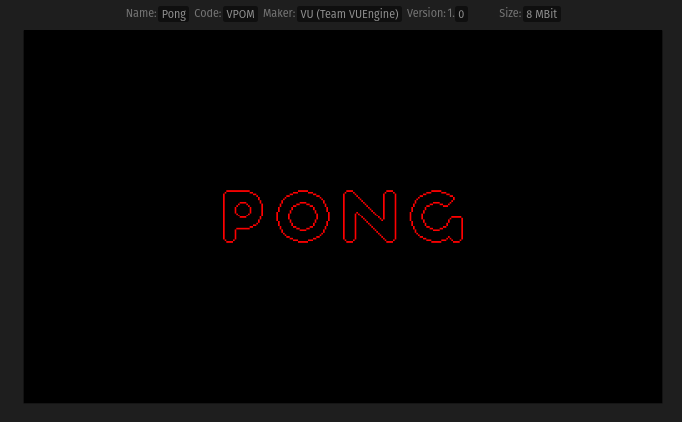
Isn’t it a beauty? We are now ready to add another custom GameState , this time one that will hold the actual Pong game.